The ease of this purchase was a good start. The content of this manual was exactly all I needed to retore my Tandberg 64.
All of the mechanical and electrical information is contained in the manual and the quality of the document makes reading the data easy.
The exerience with the resource has made this my prime source for technical data.
Owner-manuals.com is the best Possibility to give vantage HIGH CLASS Elektronic COMPONENTS
a new Life.Thanks alot for your perfekt Service.
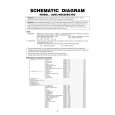
Text excerpt from page 27 (click to view)
11. Removing the chassis frame
1) Remove the back cover. (Refer to Item 1.) 2) Remove the speakers. (Refer to Item 2.) 3) Remove the top shield bracket. (Refer to Item 3.) 4) Remove Power Module unit. (Refer to Item 4.) 5) Remove the Scaler board. (Refer to Item 5.) 6) Remove the D-Rewrite board and bracket. (Refer to Item 6.) 7) Remove the back plate. (Refer to Item 7.) 8) Remove the TU/AOUT, AV2 and Signal boards. (Refer to Item 8.) 9) Remove the Front/AV board. (Refer to Item 9.) 10) Remove the Power SW and LED/RMT boards. (Refer to Item 10.) 11) Remove 2 screws (PP 3x6), then remove the cord holder. 12) Remove 4 screws (PP 3x6), then remove 2 fan bracket holders. 13) Remove 4 screws (PP 3x20), then remove the 2 DC fans. 14) Remove 10 screws (PBI 4x12) and 8screws (PP 4x10), then remove the chassis frame.
PP 3x6 Fan bracket holder PP 3x6 DC Fan