|
|
|
Who's Online
There currently are 6043 guests online. |
|
Categories
|
|
Information
|
|
Featured Product
|
|
|
 |
|
|
There are currently no product reviews.
 ;
Manual-link came 30 minutes after having paid for an extremely rare (40 years old) item (sony icr-120) and helped me to get the radio rework again. So really good help for me, fast and reliable delivery and -taken that into consideration- a very reasonable price for that service. So thanks again! Mike, Germany
 ;
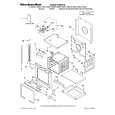
Some of the pictures in this manual are a bit irritating. I had to dissassemble the unit and some of the screws have different threads, which is not mentioned in this manual. Also some of the drawings of the boards look different than the actual boards.
After all, the manual was very useful. I was able to recalibrate the capstan drive and it is working fine again.
;
This manual is very good. 303 pages scanned in a very high resolution. My camera has bad, leaking capacitors which all of the V5000 models are suffering from these days.
There is a huge part list with all capacitors, transistors etc. in this manual which helped me a lot. Otherwise I would not have been able to buy replacement parts.
The dissassembly guide is very enormous and detailed. Unlike on the Panasonic MS1 manual I downloaded here it actually looks like the real parts look. And the screws are labeled correctly, so you shouldn't have any left after the repair. ;)
;
has all the schematics you could need,and very well laid out format also has all part numbers along with an exploded view which is helpful
;
Very nice to have! Now it is no problem to understand how it is put together.
Helps me a lot.
2. Case Study In many cases, color matching problems can be solved by returning the HIT and WID data for main deflection to the initial adjustment values. Convergence cannot be re-adjusted in the following cases. 2-1 When the CRT has been replaced Main deflection re-adjustment and color matching are necessary when the CRT has been replaced. Use the following procedure. 1. Replace the blue and red CRTs. 2. Perform the blue and red yoke horizontal adjustments in relation to the green CRT. Press the yokes and speed modulation coils + alignments onto the CRTs and fasten after making sure that there are no gaps. 3. Adjust the blue and red alignments (refer to the detailed alignment adjustment item). 4. Use centering magnets to center the blue and red CRTs in relation to the green CRT. 5. Adjust the main deflection HIT and WID data, using the most accurate location in relation to the green as data. 6. Use convergence to match the colors for each screen. Green will not work at this time. 7. When the convergence adjustments have been completed for all screens, then replace the green CRT. Repeat the procedures in steps 2 - 5 for the green CRT but this time use convergence to match the colors using red and blue as reference. 2-2 When replacing the convergence unit Generally, all of the screens must be re-adjusted when the convergence unit is replaced, but the process can be greatly shortened by using the following method. 1. Replace the memory (Q173, Q174, Q175) of the new unit (ZC01) with the memory (Q173, Q174, Q175) of the defective unit (ZC01). This makes it possible to quickly reproduce the previous screen status when installed in the set. 2. Install the new unit with the old memory in the set and turn on the power. The entire screen will move linearly in either the vertical or horizontal direction. 3. Use centering magnets to re-adjust the green, red and blue centers. 4. There is possibility of color mismatching or differences in screen size when the various screens are checked. In such case, adjust the main deflection and apply a slight amount of convergence color matching. 2-3 When none of the above cases apply (rare case) An unexpected situation or major operational error, etc., could be considered but it is recommended that all screens be matched starting from the beginning. If the initial positions of the centering magnets are unknown, disconnect the connectors for the convergence sub-yoke outputs one at a time, adjust the CRT centering and then start the following adjustments 1. Connect PAL signal. 2. Make sure that there is plenty of room for the static cross convergence to be moved left, right, up and down. If sufficient space is not available, move to an appropriate location and then re-adjust the centering. 3. Enter the convergence adjustment mode and call out the menu. 4. Select 1. ADJUST PAL 100Hz WIDE and adjust the PAL mode Wide screen manually in accordance with the dimension diagram. 5. When the PAL 100Hz WIDE screen adjustment has been completed, return to the Main Menu and select 2. PAL Wide to others. The screen will change automatically and all the other screens will be created automatically. 6. Next, select 3. ADJUST PAL 100Hz S.LIVE in accordance with the dimension diagram. 7. Next, select 4. ADJUST PAL 100Hz CINEMA and fine adjust to remove any Cinema screen distortion. 8. Next, select 5. ADJUST PAL 100Hz S.TITLE and fine adjust to remove any Subtitle screen distortion. 9. Next, select 6. ADJUST PAL Progressive and fine adjust to remove any PAL Progressive screen distortion. 10.Connect NTSC signal. 11.Next, select 7. ADJUST NTSC Progressive and fine adjust to remove any NTSC Progressive screen distortion. All of the screens can be adjusted with the above process but make every effort not to change the factory data unless absolutely necessary. Try not to change the convergence data any more than necessary.
� 25 �
SPECIFIC INFORMATIONS GENERAL ADJUSTMENTS
|
|
|
> |
|