|
|
|
Who's Online
There currently are 5583 guests online. |
|
Categories
|
|
Information
|
|
Featured Product
|
|
|
 |
|
|
There are currently no product reviews.
 ;
This was an excellent source of detailed assembly information on a device which is at least 12 years old. A very lucky find, coupled with great service.
;
Excellent Service Manual and best price on the Internet. This Service Manual covers everything you could ever need including full circuit schematics, component layout diagrams, stripdown procedure and full parts list/breakdown. I needed this to carry out a modification to one of these headunits and this manual covered everything I needed. Fast delivery, processed within a few hours.
 ;
Thought I would never find a copy of the Technics SX-EN2 Service Manual until I found Owner-Manuals.com. Price was very fair and I received the download promptly. While a photocopy, it is quite readable and includes all the pertinent information and diagrams. Thank you Owner-Manuals!
;
I really like this manual and it's reliable.I found and bought easly.thank you.
;
Thank you very much. the Instruction corresponds to my expectations. Sent it in time. I don't regret that paid money.
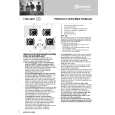
1.
Turn off the TV and unplug the power cord.
5.
Grasp the lamp unit handle and gently pull the lamp unit straight out of the TV. Set the old lamp unit aside.
2.
STOP! Allow the lamp to cool for at least one (1) hour before replacing it.
Note: Wear solt, lint-free gloveswhen replacing the lamp unit.
6. 3. On the lamp unit door on the side of the TV, loosen the screw using a manual screw driver, and then remove the lamp unit door.
TV back
Carefully insert the new lamp unit straight into the TV until it is fully seated.
Lamp unit door detail
loosen screw using manual screwdriver
Note : Never subject the lamp unit to excessive shock. Never touch the lamp unit glass or otherwise get it dirty. Doing so may affect the image quality and reduce the service life of the lamp. See �Cleaning the lamp unit glass� below. 7. Using a manual screwdriver, tighten two lamp unit screws. Note:Hand-tighten only. Do not use an electric screwdriver.
4.
Using a manual screwdriver, loosen the two screws on the lamp unit.
Lamp unit screws (use manual screwdriver only)
Lamp unit screws
- 11 -
|
|
|
> |
|